Channel - Editor
The Channel Editor is used whenever a Channel Definition or Widget Filter is viewed or changed.
The edit view consists of two components. The top part of the editor includes the overall controls for the channel. This section is only shown when a Channel is being edited. If the Channel Editor is used as part of a Widget Filter only the Channel Stage box(s) will be shown.
Channel Controls

The first row of the editor consists of input areas to name the channel and provide a description for the channel.
Below the Name and Description area are the channel control buttons. One thing to understand about the editor is that it will update the channel as changes are made. That is the reason for including the UNDO and REDO buttons in the channel control section. If you decide you don't want to keep a change to your channel, use the UNDO button to remove the changes.
Next is the DELETE button. If you want to remove the entire channel, click on DELETE. You will be asked to confirm the removal of the channel. If you are sure you want to delete it, click on DELETE in the confirmation box and the channel will be removed, otherwise click on CANCEL to return to the editor.
The next button to the right is COPY. If you would like to duplicate the channel, click on COPY and a new channel will be created with all of the same characteristics, including the name of the channel. After copying a channel, you will be left in the editor for the new channel where you can begin changing the channel as needed.
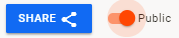
Next to COPY is the SHARE button. Sharing a channel requires that the channel be set to Public. When set to Private, The SHARE button is greyed out.
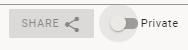
Clicking on the toggle will set the channel to Public and activate the SHARE button.
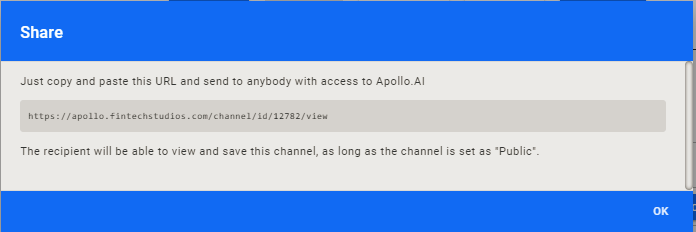
Once the SHARE button is active, you can click on it and you will be given a window containing the URL for that channel that you can copy and share through email or in a Symphony message.
Channel Filter Boxes
Below the Channel Control area (when editing a channel) is the section for entering the actual filter information. When changing a Widget Filter, this section of the editor will be the only component shown.
For a simple Channel, you can just create a list of Entities to include. For a more complicated channel, you can use a series of stage boxes to create a complicated filter using Boolean Logic.
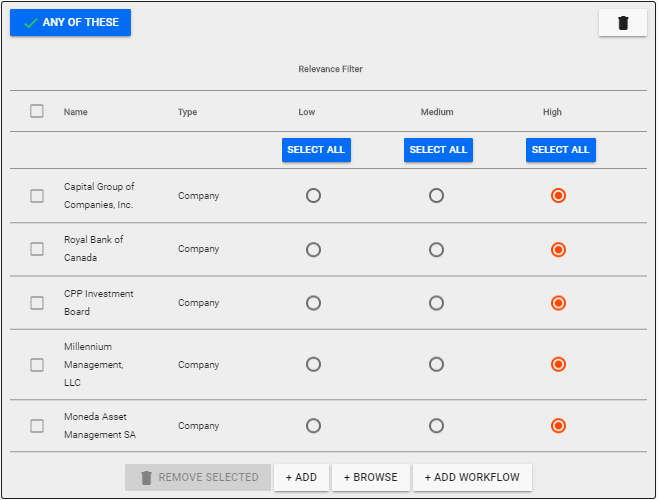
Each Stage Box is self contained from an editing perspective. At the top left of the box is a toggle button that starts out as ANY OF THESE which means that every Entity within the box will be included in the Channel regardless of what else is tagged for each article. Clicking on the toggle will switch the button to NONE OF THESE which means that everything contained in the box will be excluded from the channel.
In the top right of the box is the Delete Icon - . Clicking on the Delete Icon will delete the entire Stage Box.
Below these two buttons, is the grid containing the list of Entities that are included as part of the Channel Definition. The grid offers full grid controls.
- The first column is the check box column where you can select Entities. When at least one is selected, the REMOVE SELECTED button at the bottom of the grid is activated and when clicked will remove the checked rows from the grid.
- Clicking on the column header will sort the column.
- Hovering over a column header will display a Filter Icon - . Clicking on the filter icon will allow you to enter partial names which will filter the list using what you enter.
- Each Entity has a Relevance Filter setting which can be set by clicking in the circle in the column desired.
- Every Entity in the list can be set to the same relevance by clicking on the SELECT ALL button at the top of the column.
Below the grid are three buttons.
- REMOVE SELECTED - This button activates when at least one row is selected. Clicking on the button will remove all of the selected rows from the grid.
- ADD - This button allows you to add an Entity using the Search Bar to find the desired entity or enter a Query String for a Text Search.
- BROWSE - This button will display Entities by Entity Type and allow you to browse through them. Once you find the one desired, click on it to add it to the list.
Home PowerIntell.AI™ Apollo Pro® RegLens®